
TIG Welding Maintenance: Clean Your Torch Head Without Ruining the Gas Lens
A dirty TIG torch head can give you uneven shielding, a slipping tungsten, or an arc that won’t settle down. But attacking every part with a wire brush can turn a cleaning job into a consumables order, especially if you’re running a gas lens. The trick is knowing which surfaces you can clean, which parts need replacing, and where dirt is only a symptom of something else.
This procedure covers common hand-held TIG torches with removable cups, collets, and collet bodies or gas lenses, including many #9, #17, #18, #20, and #26 setups. Follow your torch manufacturer’s instructions where the construction differs, particularly with wedge collets, specialty diffusers, and glass cups.
1. Check Whether the Torch Head Is Actually the Problem
Start with the cup opening, tungsten, and front-end hardware rather than assuming the entire torch needs stripping. TIG doesn’t normally throw spatter like short-circuit MIG, so metal stuck inside the cup usually points to a puddle dip, filler touching the tungsten, or another process upset. Fine grinding dust is a different problem: it gets into threads and collet slots, and then parts stop seating properly. Cleaning helps, but you also need to stop feeding the torch dirt.
- Blackened or crusty cup interior: look for deposits restricting the opening or loose material that could fall into the weld.
- Tungsten slipping after tightening: inspect the collet for dirt, distortion, or a mismatch with the electrode diameter.
- Discolored tungsten after stopping: check postflow, gas delivery, leaks, and drafts—not just the torch head.
- Unstable arc: inspect the tungsten tip, electrode grip, and electrical connections before blaming the gas lens.
- Sudden loss of shielding: check for a cracked cup, damaged seal, loose consumable, or blocked diffuser.
A stainless weld turning gray doesn’t automatically mean your torch is dirty. Excessive heat, poor torch angle, too much stickout, and inadequate shielding can produce similar results. Keep those possibilities separate so you don’t spend half an hour cleaning a torch while a fan blows across the bench.
2. Shut Down Safely and Gather the Right Cleaning Tools
Let the torch cool completely, switch off the power source, and isolate it from its supply as the manufacturer directs. Close the shielding-gas cylinder valve and release downstream pressure using the equipment’s specified procedure before disassembly. For a water-cooled torch, allow any required cooldown circulation first, then shut down the cooler; routine front-end cleaning doesn’t require disconnecting coolant hoses. Don’t start taking a hot torch apart with welding gloves and call that cooled down.
- Clean, lint-free cloths and low-lint swabs
- A small, soft nylon brush reserved for welding equipment
- A plastic pick or wooden stick for loose cup deposits
- A flashlight, magnifier, and clean parts tray
- Replacement collets, seals, and cups matching your torch setup
- Manufacturer-approved, residue-free cleaner if dry cleaning isn’t sufficient
I’d start dry and use liquid cleaner only where the part manufacturer allows it. Never use chlorinated brake cleaner around welding equipment; welding heat and ultraviolet radiation can turn chlorinated solvent vapors into highly toxic decomposition products. Nonchlorinated brake cleaner isn’t automatically suitable either, because solvent compatibility and residues still matter. Keep solvents off assembled torch bodies, hoses, and seals unless specifically approved, and let cleaned parts dry completely before reassembly.
3. Disassemble the TIG Torch Without Dragging Dirt Inside
Lay the parts out in removal order so you can spot a missing insulator or an incorrectly assembled stack. Torch families and aftermarket kits don’t all use the same sequence, so check the parts diagram if anything looks unfamiliar. The goal is to remove consumables without forcing threads or pulling a contaminated tungsten tip through clean internal surfaces.
- Wipe the exterior. Remove loose bench dust before opening the torch.
- Release the electrode grip. Loosen the back cap enough to unload the collet; don’t force the tungsten through a tight collet.
- Remove the cup. Support fragile glass cups as their manufacturer specifies, and don’t twist the torch neck for leverage.
- Remove the tungsten. Where the design allows, withdraw it toward the front so a dirty tip doesn’t travel through the collet. If a swollen, contaminated end prevents removal, take the front assembly apart rather than forcing it.
- Remove the remaining consumables. Take out the back cap, collet, collet body or gas lens, and any removable insulator specified in the parts diagram.
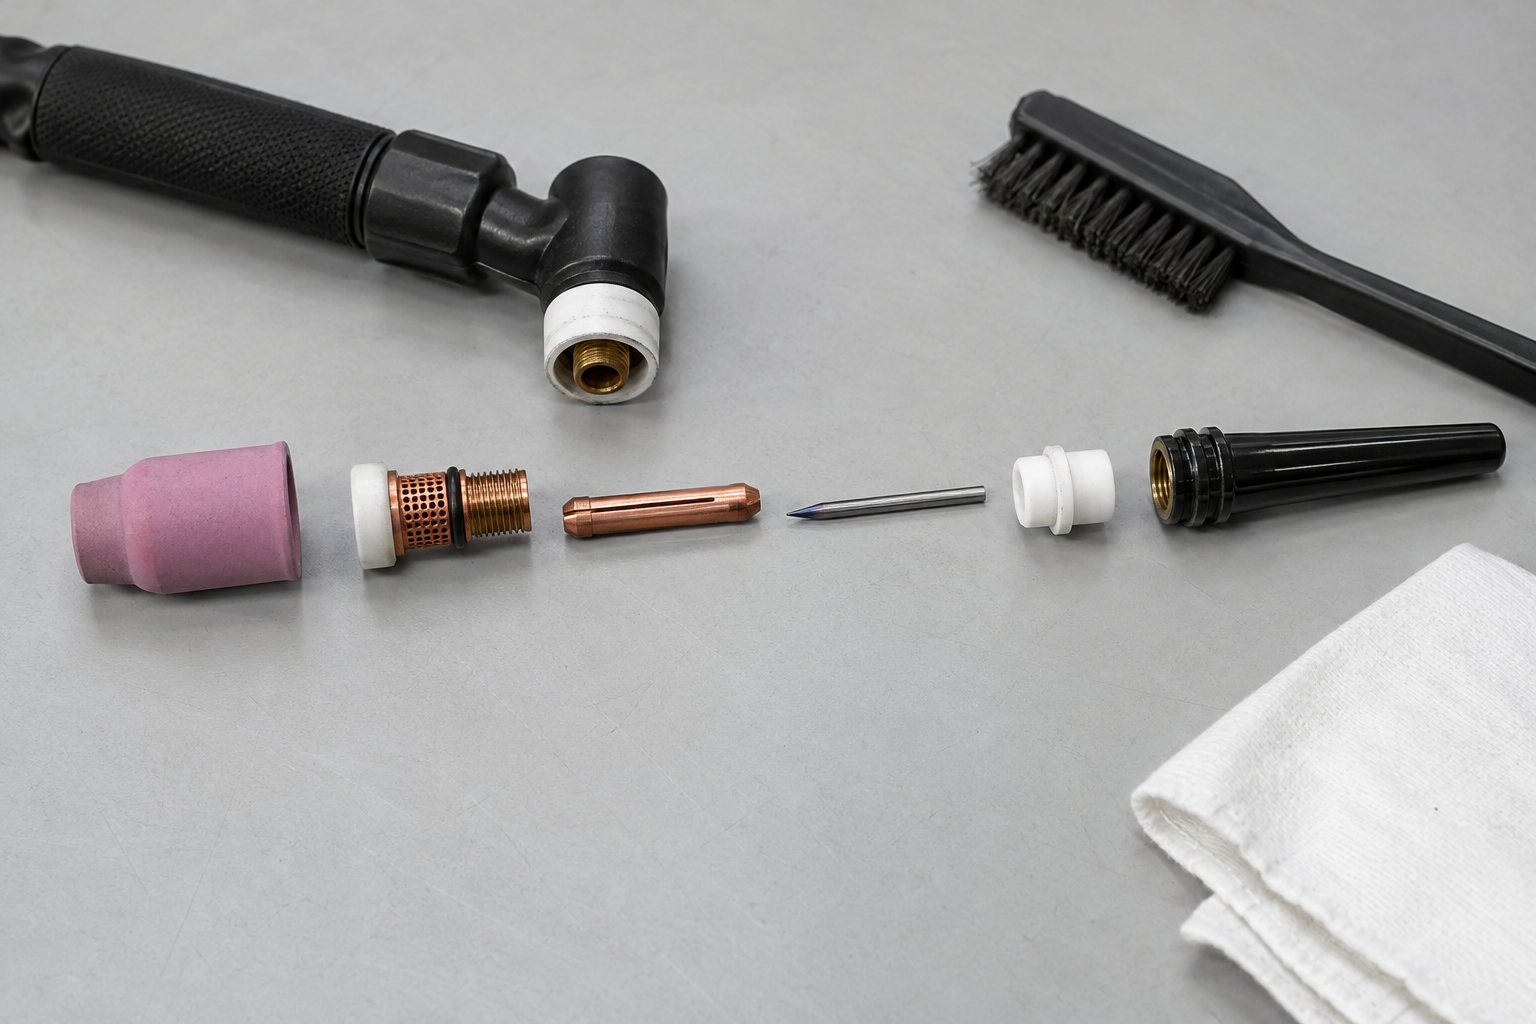
If a threaded part won’t turn with normal hand pressure, stop and inspect it. Cross-threading, overheated hardware, or deposits can lock things together, and pliers can crush a diffuser or damage the torch body. Use only the wrench flats and removal method the manufacturer provides.
4. Clean the Cup, Collet, and Gas Lens Separately
Each component needs a different level of attention because they don’t all do the same job. The cup directs shielding gas, the collet grips the tungsten and participates in the electrical contact path, and the diffuser distributes gas around the electrode. You’re restoring clean passages and sound contact surfaces—not polishing everything until it looks new.
Clean the ceramic cup and electrode-gripping parts
Brush loose dust out of a ceramic cup, then gently lift loose deposits with a plastic or wooden pick. Don’t grind the bore larger or chip away at firmly fused metal; replace a cup if deposits obstruct it and won’t release without damage. Glass and quartz cups need their own manufacturer-approved cleaning method because scratching or thermal shock can ruin them. Staining alone isn’t a reason to throw away an otherwise sound cup.
Wipe the collet and brush debris from its slots without spreading them. Clean accessible collet-body gas holes with a soft brush, but don’t run drill bits through them or enlarge them with wire. Avoid sanding the collet’s tapered seating surfaces, because removing material changes how it clamps. If the tungsten still slips with the correct components and normal tightening, a fresh collet makes more sense than another turn on the back cap.
Clean a gas lens without damaging its screens
A gas lens uses fine screens to straighten and distribute shielding gas, and those screens are easy to damage. Hold the removed lens over a clean surface and gently tap it to release loose particles, then lightly brush accessible exterior threads without working bristles into the mesh. Don’t poke through the screens, wire-brush them, or try to burn contamination out with the arc. That’s not cleaning. That’s making a less predictable diffuser.
If loose dirt won’t come out, use only a cleaning method approved for that lens. Fused metal, crushed mesh, displaced screens, or visible blockage generally calls for replacement, not an improvised solvent bath. Skip high-pressure shop air through the lens or assembled torch; it can damage delicate parts or introduce compressor oil and moisture.
5. Inspect the Torch Body, Insulator, and Back-Cap Seal
Wipe accessible torch-head surfaces with a clean cloth and use a soft brush on exposed threads. Don’t push dirty swabs deep into gas passages or flood the body with cleaner. Inspect the cup insulator and sealing surfaces while the hardware is off, because a clean diffuser can’t compensate for a cracked insulator or damaged seal.
- Collet: replace it if it’s twisted, split, mushroomed, or no longer grips the correct tungsten.
- Collet body: replace damaged threads, distorted seating surfaces, or a body with obstructed passages you can’t safely clear.
- Cup: replace cracks, loose fragments, and rim damage that compromises coverage or safe handling.
- Insulator: replace cracks, missing sections, or carbon tracking.
- Back-cap seal: replace cuts, flattening, hardening, or swelling with the specified seal material and size.
- Torch head: stop using it if the housing is burned, split, electrically exposed, or leaking coolant.
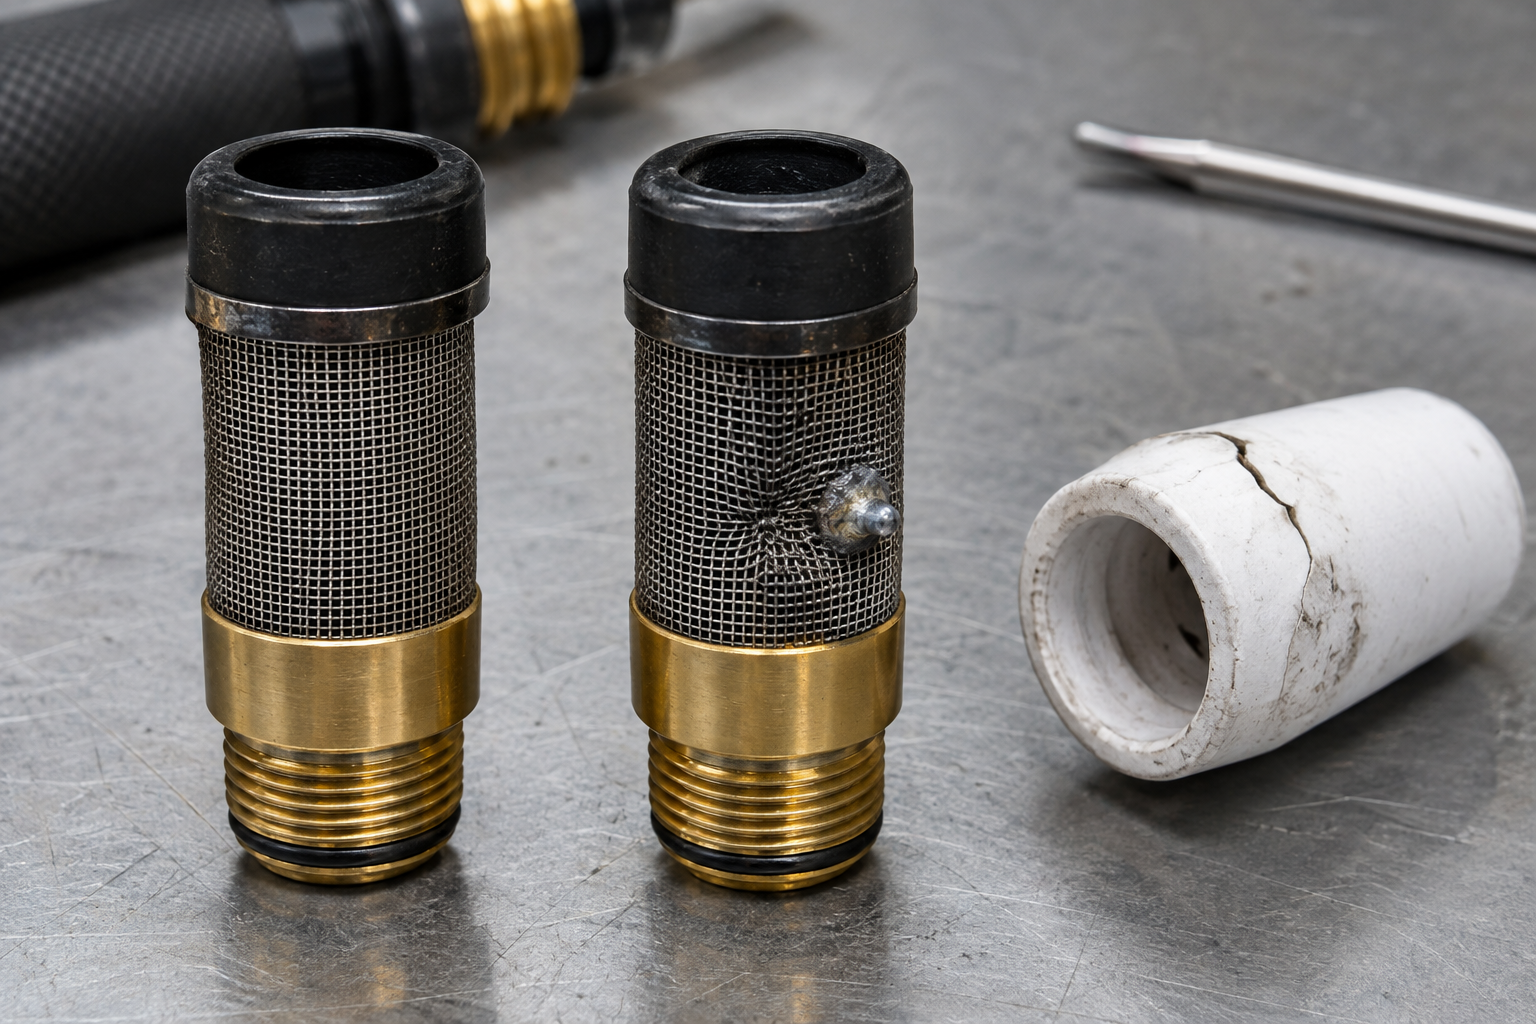
Repeatedly cooked collets deserve more investigation than another replacement. Check the torch’s actual amperage and duty-cycle rating, including any AC limitations, and verify coolant flow on water-cooled equipment. More back-cap torque won’t fix overheating.
6. Reassemble and Verify Shielding on Scrap
Match the tungsten, collet, and collet body or gas lens by size and torch compatibility. A 3/32-inch tungsten is approximately 2.4 mm, and it needs the corresponding gripping hardware—not a 1/8-inch collet tightened harder. Fit the correct insulator, start threads by hand, and tighten according to the manufacturer’s instructions. Keep grease and anti-seize off gas passages and electrical contact surfaces unless the manufacturer explicitly specifies a product and location.
- Install the front-end hardware and cup in the specified order.
- Insert a clean, properly prepared tungsten and set its stickout.
- Tighten the back cap enough to grip the electrode securely without forcing it.
- Restore gas, power, and cooling as applicable, then check for leaks and normal coolant circulation.
- Verify gas delivery and run a short bead on clean scrap matching the intended job.
For an indoor check with argon and a #6–#8 cup, roughly 15–20 CFH, or 7–9.5 L/min, is a reasonable starting flow—not a universal setting. Those cup numbers represent nominal openings of 6/16–8/16 inch, so cup size, stickout, drafts, and joint access affect what you need. A compatible torch-outlet flow tester helps confirm gas actually reaches the cup rather than merely showing flow at the regulator. Don’t crank the flow wide open; excessive flow can create turbulence and entrain surrounding air.
7. Keep the Torch Clean Without Constant Teardowns
Give the cup and tungsten a quick look before each session, and inspect again after dipping the electrode or touching filler to it. If metal has reached the diffuser, strip the front end before continuing. For intermittent clean bench work, condition-based inspection is more useful than an arbitrary teardown every few hours.
Store spare consumables in a closed container and park the cooled torch away from grinding dust. Keep a known-good collet, cup, and gas lens available so you can isolate a suspect component without guessing. Clean what can be cleaned, replace what has lost its shape or sealing ability, and correct the heat or contamination problem that caused the damage. That’s useful TIG torch maintenance—not just shiny parts.