
How to TIG Weld Stainless Steel Furniture That Stays Square and Cleans Easily
A stainless prep table can have beautiful welds and still rock on the floor, trap wash water, or rust around the joints. Commercial furniture has to carry its specified load, survive repeated cleaning, and look consistent under bright lighting. Here’s how to TIG weld stainless steel furniture with those requirements built into the fit-up, welding sequence, and finish—not chased afterward with a grinder.
1. Choose Stainless Steel and Joint Details for the Actual Service
304L stainless is a sensible starting point for indoor restaurant tables, shelving, and hospitality furniture exposed to ordinary cleaning. Consider 316L where coastal exposure or chloride contact makes additional corrosion resistance worthwhile, but don’t mistake it for bleach-proof steel. Neither grade enjoys concentrated chlorine cleaners sitting in a crevice. Get the cleaning requirements before ordering material.
For light-duty frames, 1-1/4- to 1-1/2-inch square tube with a 0.065-inch wall is a common fabrication starting point, not a load rating. That wall is about 1.65 mm thick; verify actual thickness rather than relying on a stainless gauge label. Long spans, heavy equipment, seating, and caster-mounted units need properly sized sections, bracing, connections, and welds. A bigger bead won’t rescue an undersized frame.
- 304 or 304L to matching material: ER308L is the usual filler choice.
- 316 or 316L to matching material: ER316L is the usual filler choice.
- Stainless to carbon steel: ER309L is commonly used, but the exposed carbon steel still needs corrosion protection.
- Food-service construction: Confirm applicable sanitary specifications, including any NSF/ANSI requirements, before deciding where seams, caps, and exposed fasteners belong.
A tube-to-leg connection that collects mop water is a design problem before it’s a welding problem. Where the specification requires a sealed, cleanable joint, use a continuous sound weld rather than intermittent stitches hidden under polish. Food-contact surfaces may have stricter finish and seam requirements than the supporting frame. Stainless construction alone does not establish compliance.
2. Cut, Clean, and Fit the Frame Before Striking an Arc
Square cuts and tight, repeatable joints make thin-wall stainless much easier to weld. For a typical 0.065-inch-wall mitered frame, aim for close fit-up with little or no unintended gap, unless the joint procedure specifies otherwise. A wandering 1/16-inch gap is nearly the wall thickness, and now you’re building a bridge while the edges melt away. Fix the cut instead.
Deburr inside and outside edges, remove adhesive, and degrease the joint and filler with an appropriate nonchlorinated cleaner. Let everything dry before welding, and never use chlorinated brake cleaner around an arc. Keep stainless-only brushes, files, and abrasives separate from carbon-steel tools. Embedded iron can show up later as rust freckles on an otherwise decent job.
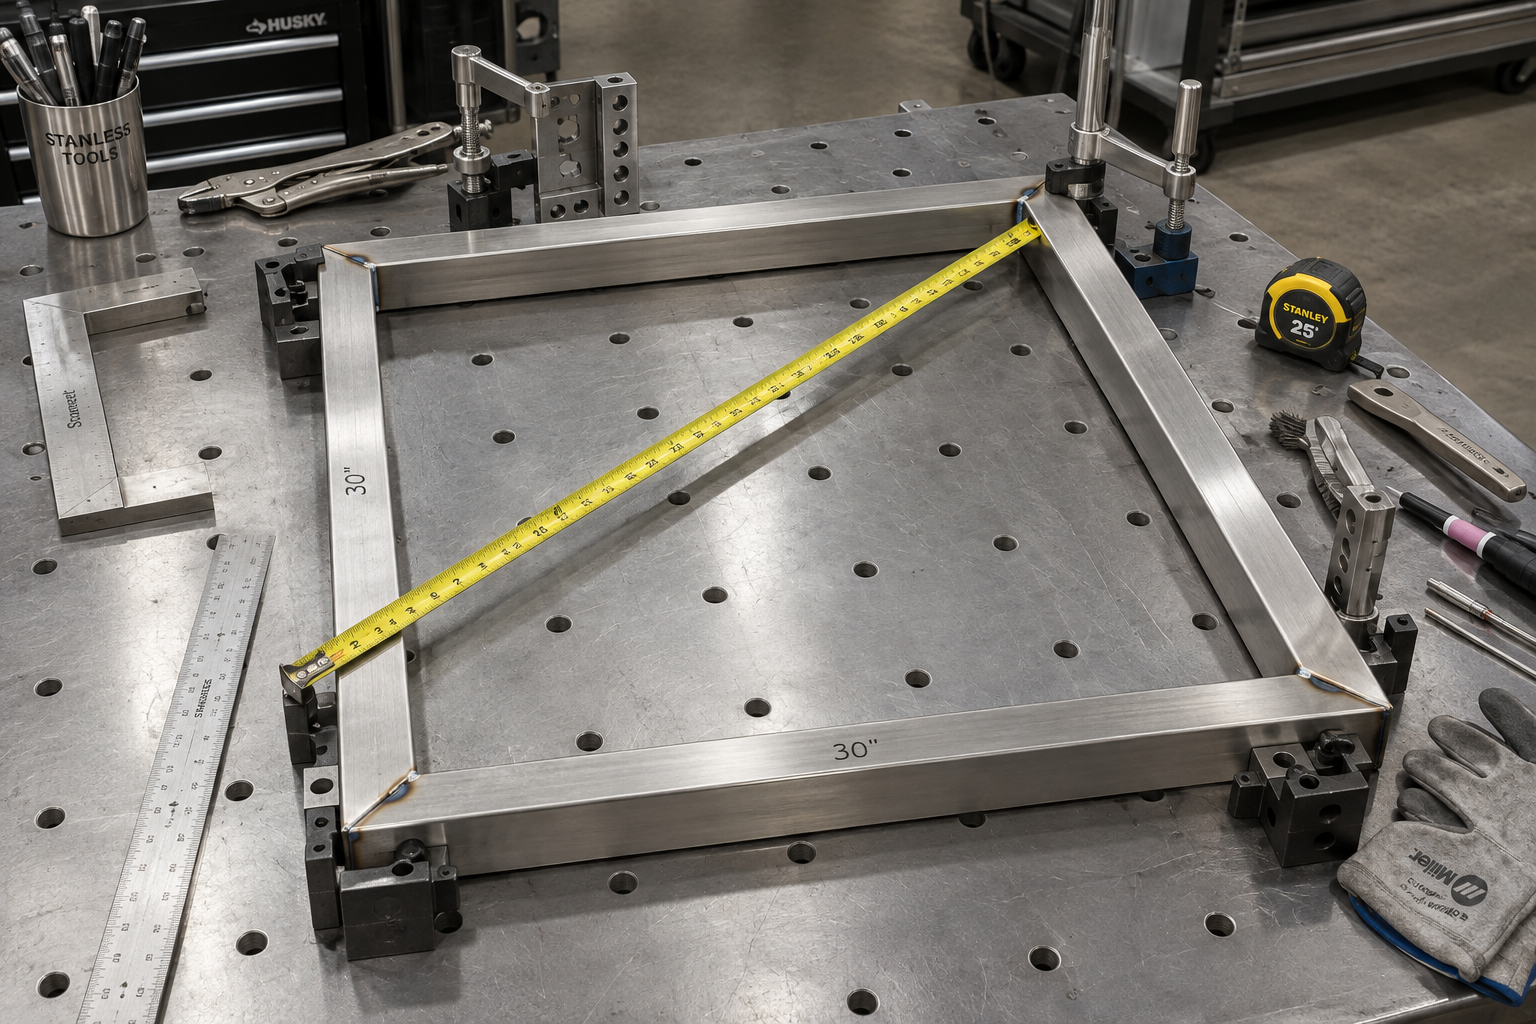
- Lay out the frame on a verified flat surface and clamp against stops.
- Measure both diagonals, then check that all corners sit in the same plane.
- Place small, sound tacks on opposing corners or faces to balance shrinkage.
- Recheck dimensions after tacking, including leg spacing and shelf clearance.
- Remove cracked, porous, or heavily oxidized tacks rather than burying them.
On a nominal 30-by-30-inch frame, equal diagonals tell you it’s square, but they don’t prove it’s flat. Check for rocking and use a straightedge across the assembly. A clean copper chill bar can help support a thin edge where it fits, provided you don’t strike the arc onto the copper. Clamps hold parts; they don’t cancel weld shrinkage.
3. Set Up the TIG Machine for Thin-Wall Stainless
Use DC electrode negative, high-frequency starting where available, and 100% argon shielding gas. A stable low-amperage arc and predictable pedal matter more here than a huge maximum output. A 150–200 A machine usually has enough output for typical thin-wall furniture, although duty cycle still matters on long production runs. A compact air-cooled torch works well at these currents; water cooling earns its keep with sustained work.
| Item | Practical starting point |
|---|---|
| 1.2 mm wall, approximately 0.047 inch | Set roughly 45–65 A maximum; control actual current with the pedal |
| 1.5–1.7 mm wall, approximately 0.060–0.067 inch | Set roughly 60–85 A maximum |
| 2.0 mm wall, approximately 0.079 inch | Set roughly 75–105 A maximum |
| Tungsten | 1/16-inch, 2% lanthanated, ground lengthwise to a point with a small flat |
| Filler diameter | 0.035–0.045 inch for delicate edges; 1/16 inch for larger fillets |
| Shielding | #7–#8 gas-lens cup; approximately 15–20 CFH argon indoors |
| Gas timing | About 0.5 second preflow and 6–10 seconds postflow |
These are coupon-test starting points, not a qualified welding procedure. An outside corner needs less current than a tube end feeding into a heavier leg, and an assembly already carrying heat needs less than a cold one. Start with about 1/4-inch tungsten stickout and increase it only when access and shielding permit. More gas isn’t automatically better; excessive flow can pull surrounding air into the shield.
4. Control the Puddle and Protect the Root
Keep the arc short—roughly 1–2 mm—and the torch about 10–15 degrees off perpendicular in the direction of travel. Establish a small puddle promptly, then move rather than sitting there warming the whole corner. Add filler at the leading edge while keeping its hot end inside the shielding envelope. On tube-to-leg fillets, bias heat toward the heavier member without losing fusion into the thin tube.
Use Pulse for Control, Not as a Cure for Slow Travel
I’d dial in a steady-current weld first, then add pulse if it improves your control. A useful trial is 1–2 pulses per second, 30–40% background current, and 35–50% peak time, with peak current adjusted on scrap. That gives you a visible rhythm for adding filler, but insufficient peak energy can still leave cold toes. Pulse only reduces heat input when the complete combination of current, timing, and travel speed does so.
Back-Purge Wherever the Root Needs Protection
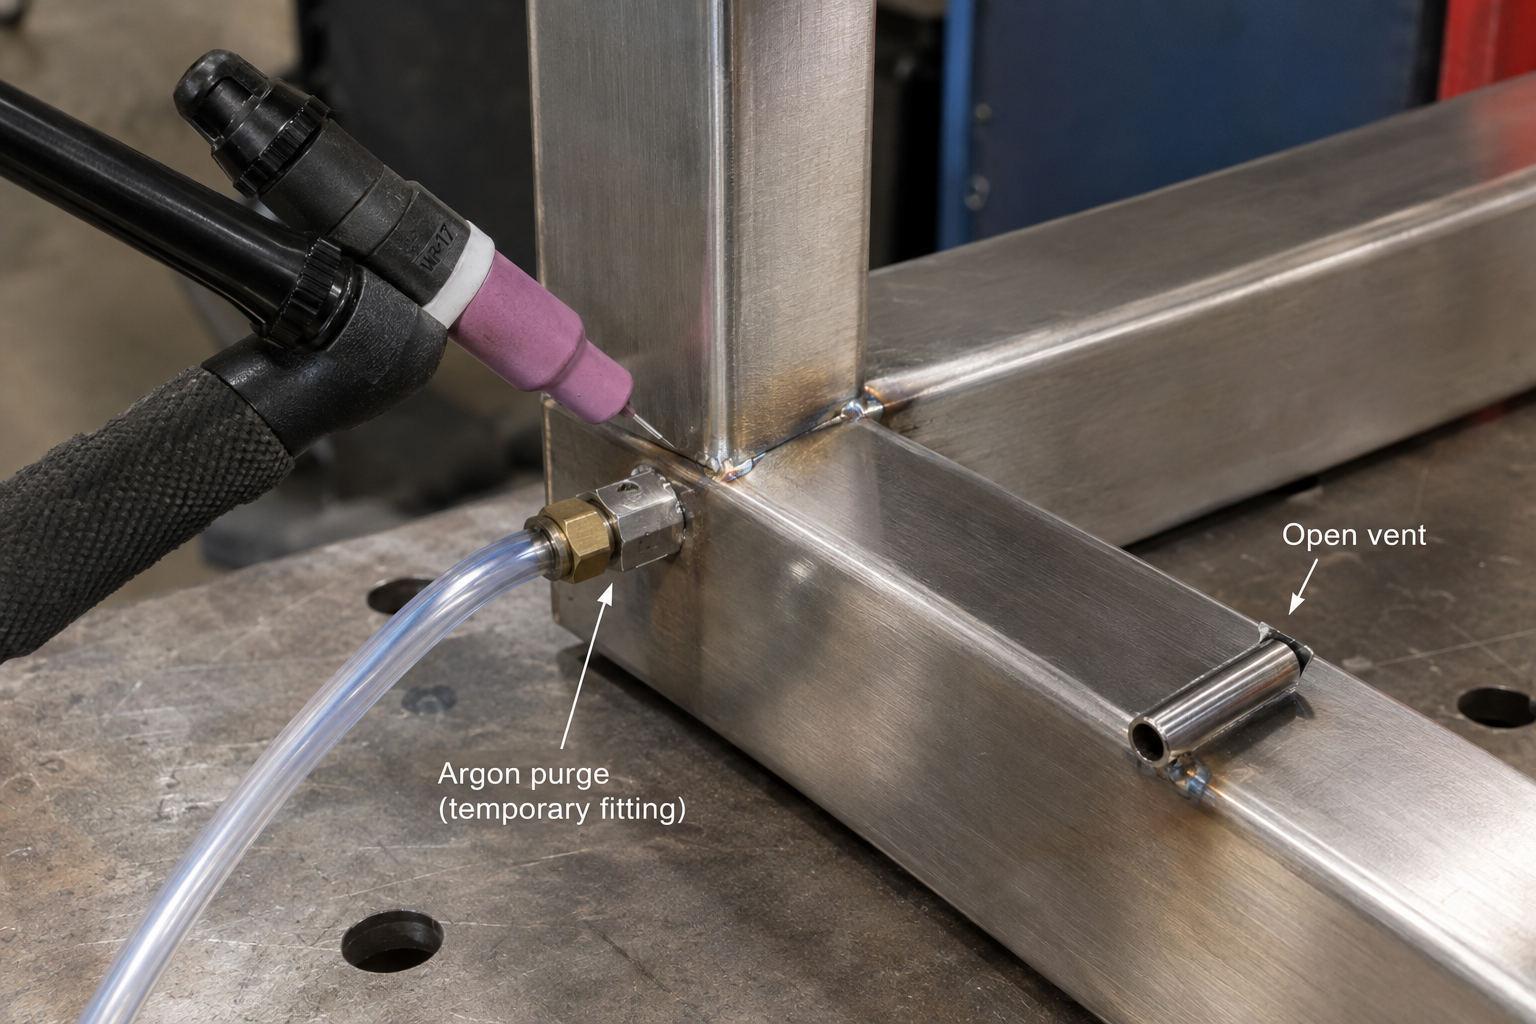
If the weld penetrates through the wall and exposes a hot root to air, internal oxidation can produce rough “sugaring.” Back-purge those roots where corrosion resistance, cleanliness, or the specified weld quality requires it. Feed argon into the enclosed section through a suitable inlet and provide an open outlet; use low flow once displaced, without pressurizing the tube. For critical work, verify oxygen with a meter against the procedure’s limit rather than guessing from purge time.
Plan purge holes and final closures before assembly makes them inaccessible. Never finish welding a sealed cavity with trapped pressure; expanding gas can blow through the closing puddle. Keep the vent path open during welding and use an approved closure detail afterward. Purging also displaces breathable air, so it needs ventilation just like the welding operation.
5. Sequence the Welds So the Furniture Stays Square
Stainless expands more and conducts heat away less readily than carbon steel, so concentrated welding heat pulls thin frames around quickly. Don’t finish every weld on one corner before touching the opposite end. On small furniture joints, alternate complete short seams around the assembly, moving between opposing corners and faces. Where longer seams need segmented welding, make sound tie-ins and maintain any required continuous seal.
- Start with inaccessible joints: Avoid building yourself into a corner where the cup won’t fit.
- Balance the shrinkage: Weld an opposing joint before adding more heat beside the first.
- Check between stages: Recheck diagonals, leg alignment, and mounting-pad flatness.
- Let hot areas cool: Measure temperature rather than testing with a bare hand.
For ordinary 304L furniture work, keeping interpass temperature below about 150°C is a reasonable upper-limit starting point unless the procedure specifies otherwise; cooler is often easier on thin assemblies. Don’t water-quench parts to rush the next weld. Let the frame cool before releasing fixtures and judging final dimensions. Leveling feet handle uneven floors, not a frame twisted into a propeller.
6. Finish Welds Without Grinding Away Their Strength
Agree on the finish before fabrication: visible as-welded beads, blended joints, or a specified directional polish. Grinding a structural fillet flush can remove the throat that carries the load, especially on thin tube. If the design calls for a flush appearance, the joint and required weld section must accommodate that finish. You can’t polish missing strength back in.
For a brushed surface, test the abrasive sequence on an offcut from the actual stock. A controlled 120-grit blend followed by 180- or 240-grit finishing may work, but grit alone doesn’t define the appearance of a No. 4 finish. Match the surrounding grain direction and avoid broad low spots. Keep pressure light enough that finishing doesn’t overheat or gouge the tube.
Heat tint signals oxidation; silver or pale straw is a useful process target, not proof of sound fusion or full corrosion resistance. Remove unacceptable heat tint and the affected surface layer using a suitable mechanical, chemical, or electrochemical process specified for the service. Passivation of a properly cleaned surface is different from pickling, and passivation alone does not remove heavy oxide. Pickling products can contain extremely hazardous acids, so leave that operation to trained personnel with the required controls.
7. Inspect the Frame Like Commercial Equipment
Inspect before polishing, because a shiny blend can hide a defect without repairing it. Look for cracks, pinholes, undercut, incomplete tie-ins, missed seams, and craters at weld stops. Taper current down while adding enough filler to fill the crater, then hold the torch in place through postflow. If a defect appears, remove it and repair the joint rather than smearing metal over it.
- Dimensions: Verify overall size, diagonals, shelf locations, and hardware clearance.
- Stability: Check on a flat reference surface before adjusting feet or fitting casters.
- Cleanability: Check for sharp edges, open crevices, rough seams, and water traps.
- Load performance: Follow the specified test method, load, and acceptance criteria—not an improvised bounce test.
- Records: Retain material identification, filler information, inspection results, and required finishing documentation.
Use local exhaust positioned so it captures stainless welding fumes without stripping away the argon shield. TIG’s low visible smoke does not eliminate hazardous chromium-containing fume, and grinding adds another exposure that needs control. The finished piece should meet its drawing, load requirements, and cleaning specification—not just photograph well. That’s the difference between a nice weld sample and commercial furniture.