Building a Custom Grill or Smoker with TIG Welding: A Practical 24-Inch Build
Building a Custom Grill or Smoker with TIG Welding: A Practical 24-Inch Build
A custom cooker needs more than pretty welds. It needs a lid that still closes after the first hot cook, air controls that actually control the fire, and grates you can remove without taking half the thing apart. For building a custom grill or smoker with TIG welding, I’d start with a manageable charcoal-fired box: a 24-inch-wide, 20-inch-deep, 18-inch-tall cooking chamber. That gives us a useful example for material selection, TIG settings, joint design, and distortion control without turning the project into a trailer build.
1. Design the Cooking Layout Before Cutting Steel
This design uses charcoal for heat, with wood chunks for smoke, rather than a separate offset firebox burning full splits. Put the charcoal basket toward one side and leave the other side available for indirect cooking. A removable diffuser above the basket helps shield food during smoking, while removing it opens up direct grilling. It’s a combination cooker, but the internal layout has to support both jobs.
Draw a cross-section showing the charcoal basket, ash clearance, cooking grate, and lid before making your cut list. Aim for roughly 6–8 inches between the charcoal bed and the main cooking grate, with alternate grate supports for adjustment. Leave room below the basket for ash to accumulate without choking the fire. The outside dimensions alone won’t tell you whether everything fits.
- Cooking chamber: approximately 24 × 20 × 18 inches outside, with plate thickness accounted for in the cut list.
- Cooking grate: roughly 22 × 18 inches, preferably split into two removable sections.
- Charcoal basket: removable, with a replaceable heavy-steel bottom or grate.
- Service access: allow basket and ash-pan removal without disturbing welded supports.
- Frame: 1-1/2-inch square tubing with a 0.120-inch wall is a reasonable starting point, provided the footprint and bracing suit the finished load.
2. Choose Steel for Heat, Cleaning, and Repair
For this size cooker, 1/8-inch mild-steel plate is a practical shell material. It’s stiff enough to fabricate without fighting every panel, and it tolerates heat better than thin sheet, although direct charcoal exposure can still distort it. A fully enclosed box at these dimensions contains roughly 90 pounds of 1/8-inch plate before adding legs, grates, and hardware. Plan the handling and caster capacity accordingly.
304L stainless is worth considering for cooking grates, drip trays, and a cooker that will live outdoors. It costs more, and its greater thermal expansion and lower thermal conductivity make thin stainless panels lively under the torch. I’d use mild steel for an economical first shell and stainless for removable food-contact components. An all-stainless build makes sense when corrosion resistance justifies the extra material and fabrication work.
- Mild steel to mild steel: ER70S-2 or ER70S-6 filler, selected for the material and procedure; neither excuses dirty steel.
- 304L stainless to 304L: ER308L filler.
- 304L to mild steel: ER309L is commonly used, but mechanical attachment may better accommodate replacement and thermal movement.
- Direct-fire components: consider 3/16- or 1/4-inch steel where weight allows, and make wear parts replaceable.
Buy identifiable, uncoated stock rather than building the cooking chamber from mystery scrap. Don’t use galvanized steel, cadmium-plated hardware, painted scrap, or unidentified coatings in the hot zone. Avoid repurposed fuel tanks and drums; cutting or welding a supposedly empty container can cause an explosion. Burning something out does not prove it is safe for fabrication or food use.
3. Set Up the TIG Machine for the Actual Joint
Use DC electrode negative with 100% argon for mild steel and stainless. A 3/32-inch, 2% lanthanated tungsten, ground lengthwise to a tapered point with a small flat, covers most of this project. Start with a #7 or #8 gas-lens cup and approximately 15–20 CFH indoors, then adjust for cup size and coverage. More gas isn’t automatically better; excessive flow can pull air into the shielding envelope.
Starting amperage ranges—not fixed pedal positions
| Material and thickness | Approximate working range | Typical filler diameter |
|---|---|---|
| 304L stainless, 16 gauge, about 0.060 inch | 45–75 A | 0.045–1/16 inch |
| 304L stainless, 14 gauge, about 0.075 inch | 60–95 A | 1/16 inch |
| Mild steel, 1/8 inch | 100–150 A | 1/16–3/32 inch |
| Mild steel, 3/16 inch | 140–200 A | 3/32 inch |
Outside corners generally need less current than fillets where both members pull heat away. Set enough maximum amperage to establish the puddle promptly, then back off the pedal as the joint heats up. Test on offcuts with the same joint geometry before touching the cooker. A 200-amp machine is useful here, but its duty cycle and the torch rating still limit how long you can weld.
For 1/4-inch parts, don’t assume one slow pass will produce adequate fusion. Use a suitable bevel and multiple passes where the joint requires them, and consider a water-cooled torch for sustained higher-current work. TIG gives excellent control, but it isn’t the fastest way to assemble a heavy firebox. There’s nothing wrong with using another suitable process for heavy structural welds.
4. Fit and Tack the Shell Before Chasing Beads
Remove mill scale, rust, oil, and cutting residue from the joint area, including the backside where practical. Degrease with an appropriate nonchlorinated cleaner, let it evaporate completely, and keep solvent containers away from welding. Use dedicated abrasives and brushes on stainless so you don’t embed carbon-steel contamination. Clean, clean, clean—TIG will show you what you missed.
For a beginner-friendly shell, use consistent outside-corner joints with closely fitted edges rather than irregular gaps you have to bridge with filler. Clamp the box square, compare diagonals, and place small tacks about every 2–3 inches, adjusting spacing where the panels want to move. Feather bulky tack ends so the weld ties in cleanly. Don’t fully weld one wall while the others are still loose.
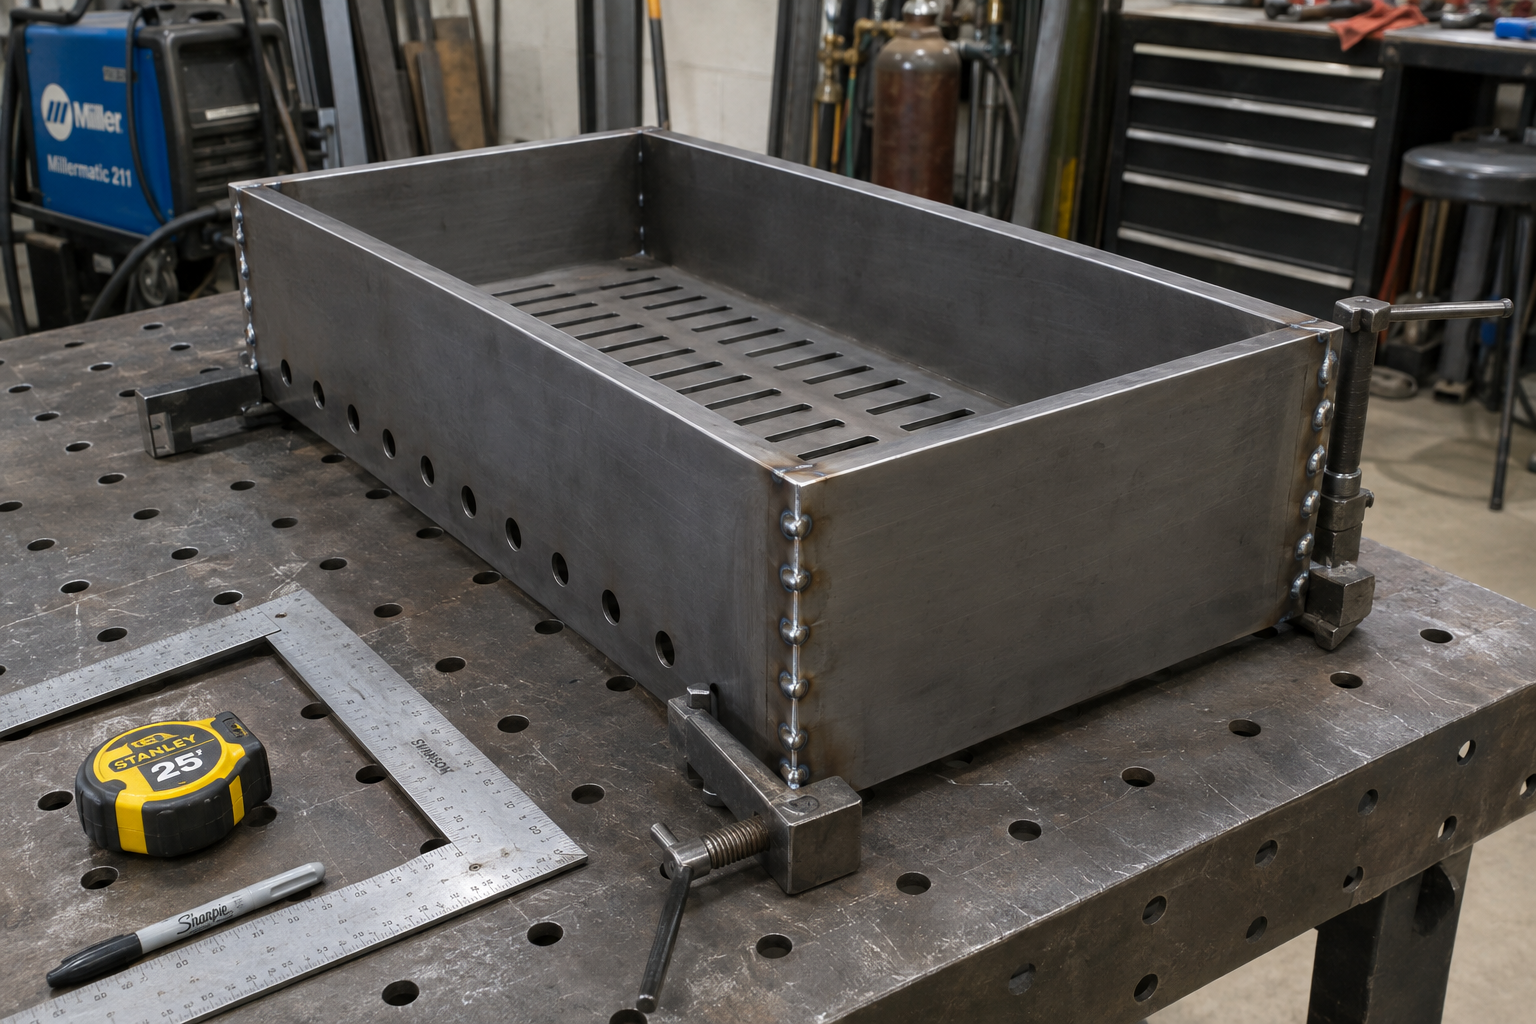
Weld short sections—roughly 1–2 inches—and move to an opposing seam instead of marching around the box. Let the assembly cool between rounds, and check the lid opening repeatedly because weld shrinkage can pull it into a diamond. Keep a short arc, roughly one tungsten diameter or less where access permits, and feed filler into the leading edge of the puddle. Make cooking-chamber seams continuous eventually, but don’t make them continuous in one sitting.
5. Build a Lid and Grates That Can Move With Heat
A flat lid needs stiffness, but a heavy welded frame can pull it crooked before it ever sees charcoal. Tack the lid flange or stiffeners in a balanced pattern and verify the fit before finishing their welds. Use hinges with enough clearance to avoid binding, and add a positive opening stop so the lid cannot overtravel and tip the cooker. Keep handles away from hot sheet metal with suitable standoffs and heat-resistant grips.
Leave clearance around removable parts
A 24-inch length of 304 stainless grows approximately 1/8 inch over a 500°F temperature rise. That’s enough to jam a grate fitted tightly at room temperature, so leave around 1/8 inch per side as a practical starting clearance, with more if the geometry demands it. Let grates rest on supports rather than welding them rigidly into the shell. You’ll appreciate that when it’s time to clean them.
For homemade stainless cooking grates, 1/4-inch solid rod at roughly 3/4-inch centers is a workable layout with cross-supports to limit sag. Keep welds accessible for cleaning and avoid open-ended tubing where grease and wash water can collect. If a stainless joint has a root exposed to the cooking chamber, provide backside argon shielding where needed to prevent sugaring. A crusty, oxidized root is not a food-contact finish.
6. Make the Airflow Adjustable and the Grease Path Predictable
Put the intake below the charcoal bed and the exhaust high on the opposite side of the chamber. This encourages air through the fuel and across the cooking space instead of giving it a short path straight out. For this compact charcoal cooker, a 3-inch-inside-diameter exhaust provides about 7 square inches of outlet area. Adjustable intakes totaling roughly 6–10 square inches of maximum clear opening are a starting point for testing, not a guaranteed airflow formula.
Stack height, restrictions, fuel loading, and wind all affect how that arrangement behaves. During normal smoking, keep the exhaust substantially open and regulate heat mainly with the intake and fuel quantity rather than strangling the outlet. Give sliders enough overlap to shut down unwanted air, but enough running clearance that ash and heat won’t seize them. An offset wood burner needs separate firebox, throat, and stack sizing; don’t copy these openings onto one.
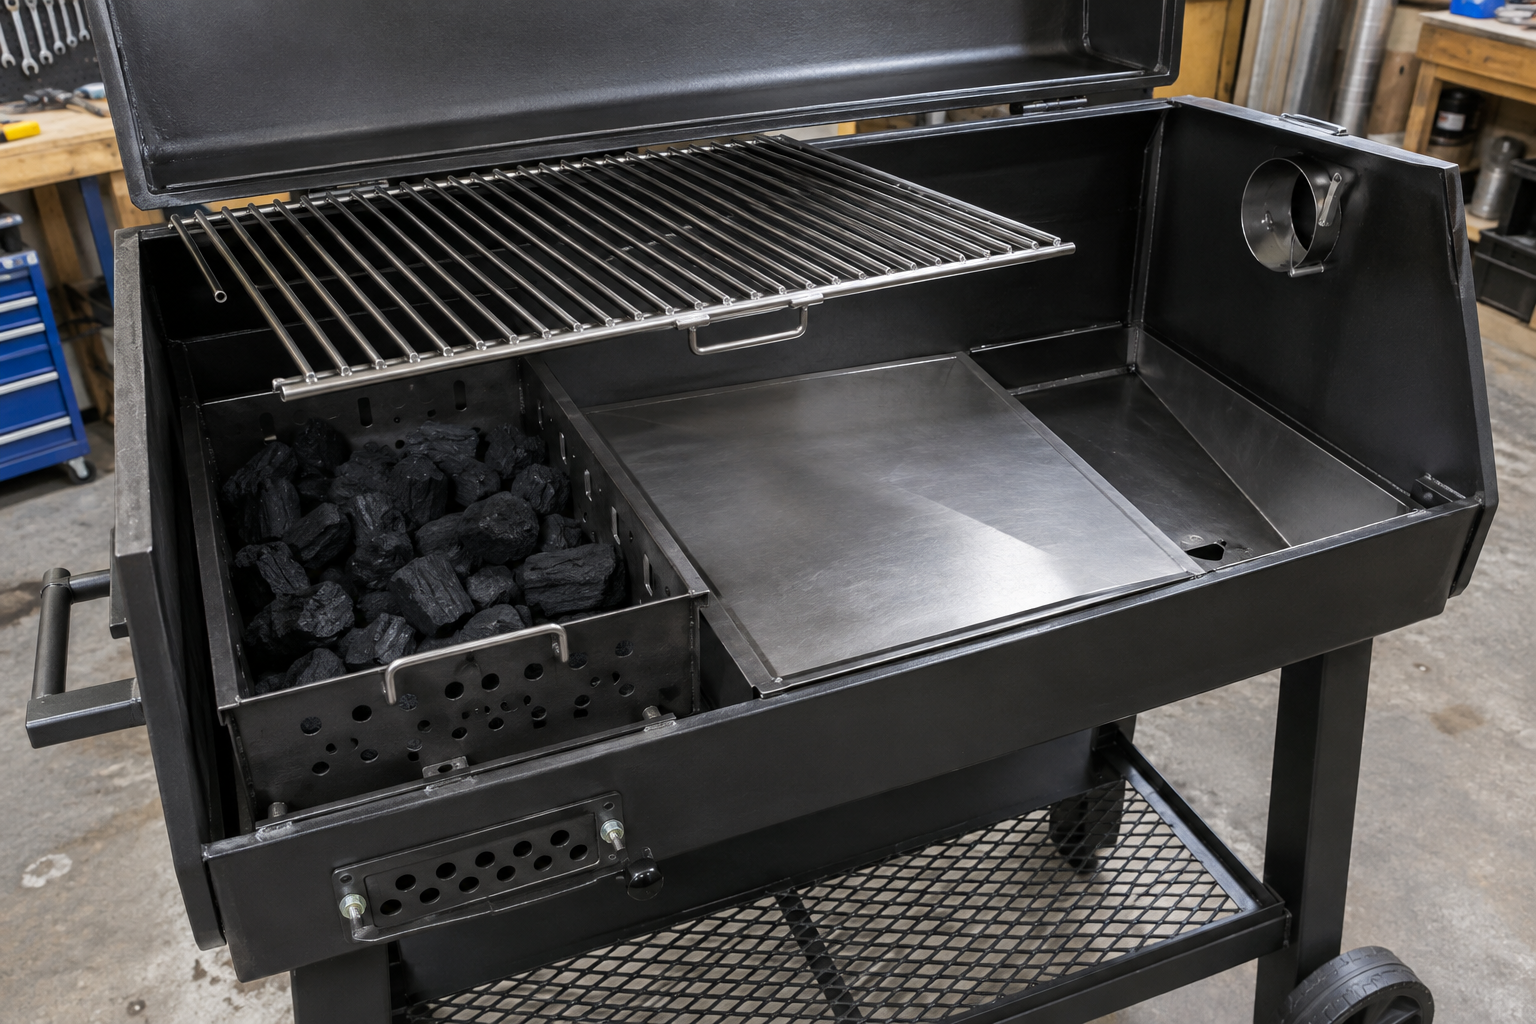
Use a removable sloped drip tray beneath the indirect cooking area, with a cleanable drain into a stable metal catch container away from the fire. Don’t route grease across the charcoal basket or let it pool behind an interior flange. Position thermometer ports near grate height and away from direct radiant heat. Lid temperature alone can be a lousy guide to what the food is seeing.
7. Inspect, Test-Fire, and Finish the Cooker
Inspect every weld before applying a finish: look for cracks, pinholes, undercut, and edges that never properly fused. Smooth sharp corners and food-contact roughness without grinding structural welds flat just for appearance. Remove stainless heat tint using appropriate mechanical cleaning or a controlled treatment suitable for food equipment; passivation alone does not remove heavy oxide scale. Wash removable food-contact parts thoroughly afterward.
- Check stability: open the lid fully, load the shelves, and verify that the cooker cannot tip or roll unexpectedly.
- Check controls cold: cycle hinges, dampers, grates, and ash access through their full travel.
- Run a small outdoor fire: watch for lid movement, binding parts, smoke leaks, and excessive handle temperatures.
- Increase heat gradually: compare grate-level temperatures and adjust the diffuser or airflow layout.
- Finish appropriately: apply exterior high-temperature coatings only where their instructions permit, then follow the specified cure schedule.
Keep ordinary paint out of the cooking chamber and off grates; seasoning bare mild steel is separate from curing an exterior coating. Operate the cooker outdoors, away from combustibles and never inside a garage, because charcoal produces carbon monoxide. After the first full heat cycle, let everything cool and recheck the welds, lid fit, and fasteners. The real test isn’t how the bead looks on the bench—it’s whether the cooker stays square, draws properly, and comes apart for cleaning.