TIG Filler Rod Storage: Prevent Contamination and Keep Tungsten Weld-Ready
TIG Filler Rod Storage: Prevent Contamination and Keep Tungsten Weld-Ready
A filler rod can look usable and still carry enough oil, moisture, or shop dirt to cause trouble in the puddle. Tungsten has a different problem: loose electrodes get mixed together, prepared points get damaged, and contaminated tips find their way back into the torch. Good TIG filler rod storage prevents those problems without turning your welding bench into a laboratory.
1. Keep Filler Rods Dry, Covered, and Away From Grinding
Store TIG filler rods in a clean, dry location where the temperature stays reasonably stable. An open rack beside the welding table is convenient, but it also collects grinding dust, cutting-fluid mist, and whatever blows through the shop door. A cabinet away from the grinder is a better starting point, with capped containers inside it.
Condensation is the moisture problem that catches people off guard. Bring a cold tube of filler from an unheated truck into a warm, humid shop, open it immediately, and moisture can condense on the cold metal. Leave the container closed until its contents have warmed above the shop’s dew point before opening it.
- Keep containers off concrete floors and away from doors, roof leaks, and wash areas.
- Don’t store filler beneath shelves holding oil, coolant, or cleaning chemicals.
- Use a small hygrometer to spot persistent humidity problems; below roughly 50% relative humidity is a useful housekeeping target, not a universal filler-metal specification.
- Follow the filler manufacturer’s storage requirements and any applicable welding procedure or quality-system rules.
Bare TIG filler rods aren’t low-hydrogen stick electrodes, so don’t automatically put them in a rod oven. Heating isn’t a substitute for removing contamination, and an improvised bake can damage packaging or conflict with the manufacturer’s recommendations. Dry storage is the goal, not hot storage.
2. Choose Containers That Protect the Whole Rod
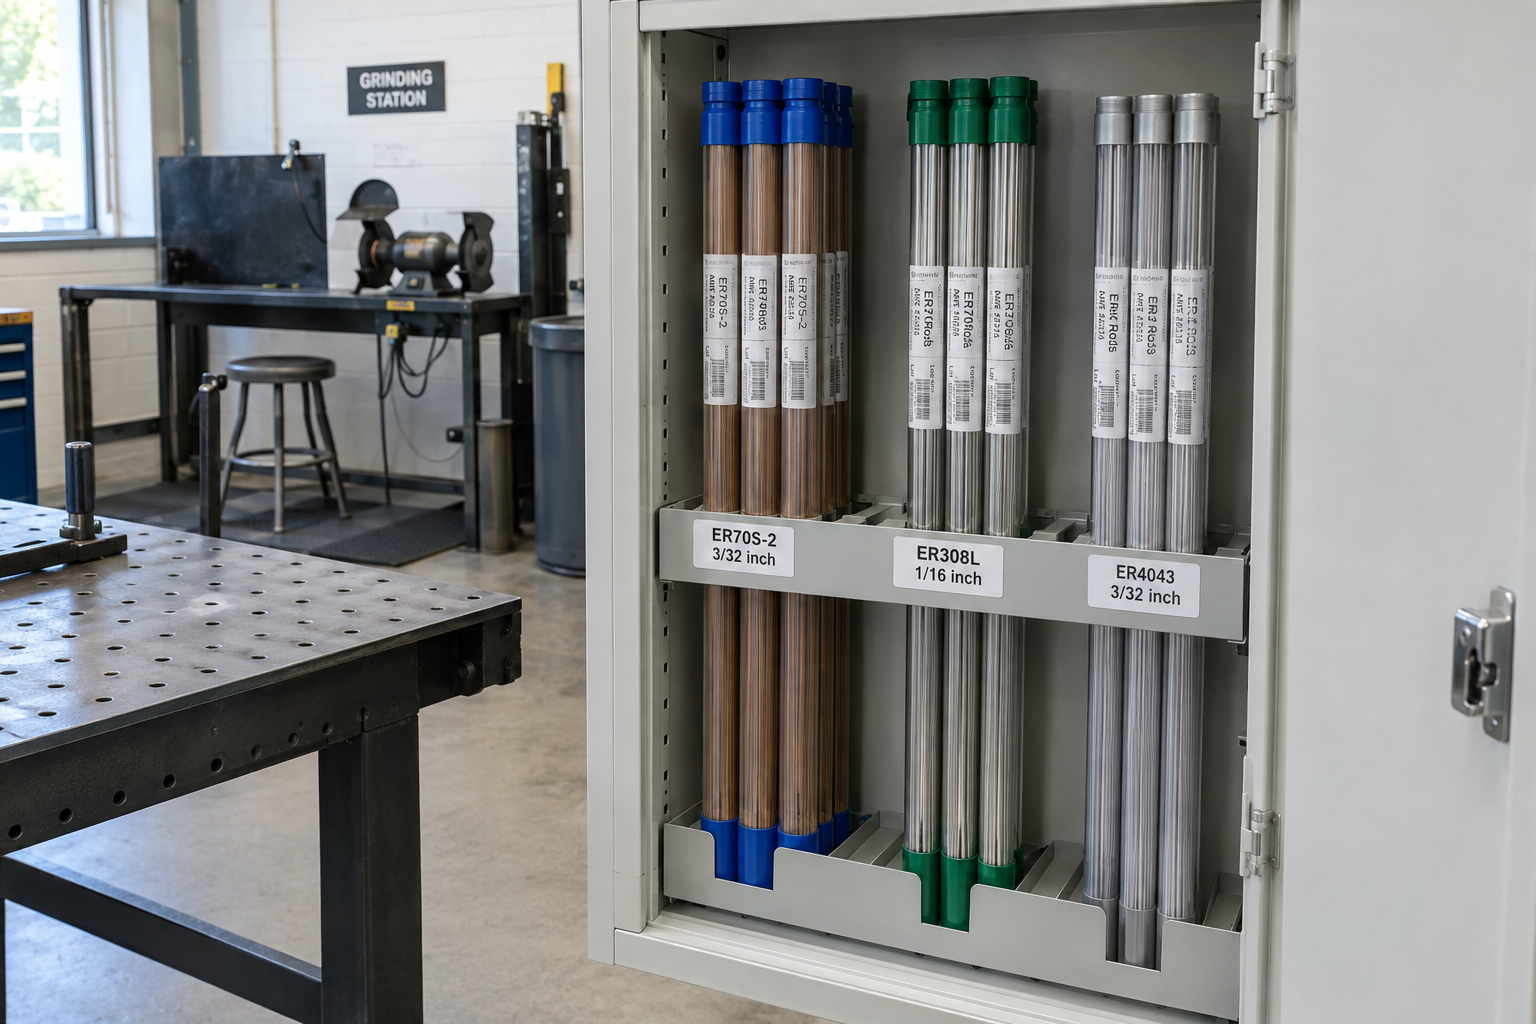
For standard 36-inch filler rods, choose a rigid container with enough internal length to close without bending the rods or forcing the cap. Purpose-built polymer tubes work well because they’re easy to wipe down and don’t shed cardboard fibers into the filler. The cap matters more than the color: it needs to stay attached, seal reliably, and remain usable with gloves on.
Original packaging is fine if it’s intact, closes properly, and stays protected in a cabinet. Torn cardboard sleeves and open-ended bundles aren’t much protection in an active fabrication shop. I’d rather have a few sturdy, clearly labeled tubes than an impressive rack of exposed filler collecting abrasive dust.
Use desiccant as backup, not as a repair
A contained desiccant packet can help control residual humidity inside a reasonably sealed tube. Keep it from breaking open among the rods, and inspect or replace it according to the packet manufacturer’s instructions. Desiccant won’t remove oil, reverse corrosion, or make wet filler immediately ready to weld.
- Vertical storage: Secure the tubes so they can’t tip over, and keep the bottom interiors clean.
- Horizontal storage: Support containers so they don’t sag or roll off the rack.
- Homemade tubes: Remove cutting chips and burrs, and keep adhesive residue and uncured solvent cement away from filler.
3. Label Alloy, Diameter, and Lot Before Separating the Bundle
A shiny rod isn’t an identification system. ER308L and ER316L stainless filler can look essentially identical, and ER4043 and ER5356 aluminum filler shouldn’t be selected by appearance either. The wrong rod may feed beautifully and still leave you with the wrong weld-metal properties.
Label each container before transferring anything out of the original package. At minimum, record the filler classification and diameter; for traceable work, retain the manufacturer, heat or lot number, and associated documentation. Keep the original label with the tube instead of trusting a handwritten abbreviation six months later.
- Classification: Write “ER70S-2,” not just “steel.”
- Diameter: Record sizes such as 1/16 inch (1.6 mm), 3/32 inch (2.4 mm), or 1/8 inch (3.2 mm).
- Traceability: Add the manufacturer and heat or lot number where required.
- Status: Mark questionable material “HOLD—DO NOT USE” rather than leaving it beside accepted stock.
Put the identification on the tube body, not only on a removable cap. Caps get swapped, particularly when two people are pulling filler from the same cabinet. Color coding can speed things up, but the written classification should settle the question.
4. Handle Aluminum, Stainless, and Steel Filler Differently
Aluminum filler deserves particular attention to moisture and surface condition because hydrogen contamination is a major cause of porosity in aluminum welds. Aluminum naturally develops an oxide film; ordinary surface oxide doesn’t automatically mean a rod is scrap. Visible corrosion, heavy chalky deposits, or a wet-storage history are different matters and need evaluation before use.
Stainless filler needs protection from carbon-steel debris as well as oil and moisture. Don’t lay ER308L rods across a bench covered in mild-steel grinding dust and then put them back into clean stock. A dedicated clean tray is cheap insurance, especially where corrosion performance or surface finish matters.
Carbon-steel filler is less fussy about incidental contact with clean steel, but rust and lubricant still don’t belong in the puddle. Some rods have a copper coating, while others don’t, so color alone isn’t a reliable condition check. Look for actual corrosion, residue, damaged surfaces, and evidence that the package has been wet.
Clean light residue without spreading it around
For light surface oil on otherwise sound filler, follow the manufacturer’s cleaning guidance and wipe with a clean, lint-free cloth and an approved residue-free cleaner. Change the cloth when it gets dirty; otherwise, you’re mostly redistributing the oil. Let the rod dry completely before welding or closing it back into storage.
If acetone is permitted by your shop’s procedure, use appropriate ventilation and chemical-resistant gloves selected from its safety data sheet, and keep it away from ignition sources. Never use chlorinated brake cleaner or other chlorinated solvents around welding. Aggressively sanding an entire bundle isn’t my first choice either, because it can introduce abrasive debris and destroy identification without resolving deeper corrosion.
5. Store Tungsten by Composition, Diameter, and Tip Condition
Tungsten electrodes don’t have the same moisture sensitivity as flux-coated consumables, but they still need clean, protected storage. Their biggest practical storage problems are mixed compositions, chipped points, and dirty electrodes being mistaken for prepared ones. Keep new tungsten in its labeled packaging until you need it.
Separate electrodes by composition and diameter—for example, 2% lanthanated, 3/32 inch (2.4 mm). Retain the stated classification as well as the color identification, because the painted end may disappear when an electrode gets cut into shorter pieces. An unmarked short tungsten is not something I’d identify by how the arc happens to feel.
- New: Unused electrodes in original or equivalently labeled packaging.
- Ready: Prepared electrodes in individual slots or a clean covered case.
- Rework: Dipped, damaged, or suspect electrodes stored separately until inspected and prepared again.
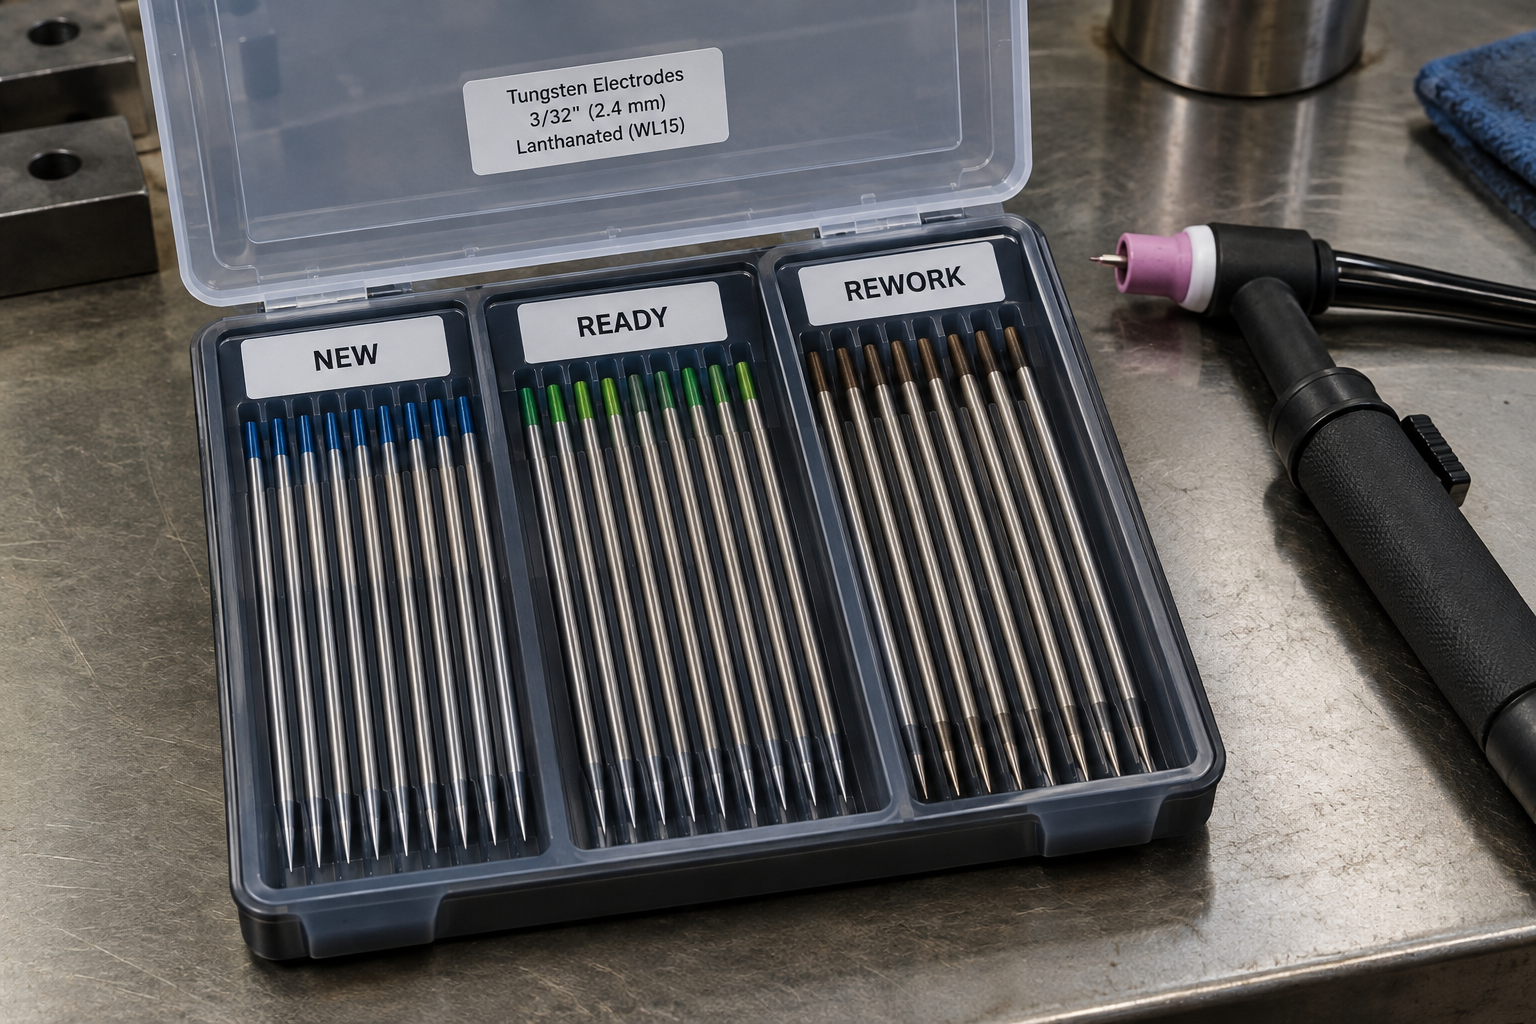
Don’t throw sharpened tungsten into a drawer with collets, drill bits, and loose hardware. Protect the points from impacts and keep them off oily foam or dirty rags. That matters most on delicate starts: a damaged point is more noticeable welding thin sheet at low amperage than running a broad puddle on heavy plate.
Storage doesn’t make a dipped electrode clean again. Remove contamination completely before preparing the tip with a dedicated tungsten-grinding setup, following appropriate dust controls. For thoriated tungsten, follow the supplier’s safety data sheet and applicable rules, particularly for grinding dust and waste; don’t blow that dust around with compressed air.
6. Separate Working Stock From Stored Stock
Pull only the filler you expect to use for the immediate task and close the main container. For a small stainless bracket, that might mean two or three rods on a clean tray rather than the whole bundle spread across the table. You reduce exposure, and the unused supply stays identifiable.
A separate working-stock tube is useful for short rods, provided every piece has a known classification and diameter. Don’t combine random leftovers just because they’re all roughly 18 inches long. The material you save isn’t worth a questionable weld.
- Confirm the required filler against the job instructions or welding procedure.
- Remove a small working quantity with clean hands or clean gloves.
- Keep rods on a dedicated tray, away from grinding and solvent work.
- Inspect unused rods before returning them, and return only clean, positively identified material.
- Put prepared tungsten back in its protected holder instead of leaving it loose on the machine.
For mobile work, carry rigid tubes inside a secured toolbox or rack where they won’t get crushed. Keep them away from leaking fuel containers and oily tools, and don’t assume a friction-fit cap is waterproof. After a wet trip, inspect the container and contents before they rejoin clean shop stock.
7. Know What to Clean, What to Quarantine, and What to Scrap
Storage mistakes need a decision, not another label saying “probably okay.” Light removable handling residue on identified, otherwise sound filler may be recoverable under the manufacturer’s guidance. Corrosion, unknown chemistry, or lost traceability is a different problem, and wiping the rod doesn’t fix it.
- Clean and reassess: Known filler with light surface residue, no corrosion, and a permitted cleaning method.
- Quarantine: Wet packages, unexplained discoloration, suspect lot identity, or exposure to unknown chemicals.
- Remove from welding stock: Unidentified loose rods, heavily corroded filler, or material rejected under the applicable procedure.
- Rework tungsten: Identified electrodes with removable tip contamination and enough remaining length for safe, secure torch installation.
A practice bead can reveal obvious feeding or porosity problems, but it cannot prove an unknown rod’s chemistry or restore missing paperwork. For code work, pressure equipment, or corrosion-critical service, follow the governing acceptance requirements rather than improvising a bench test. If you can’t establish what the filler is, don’t use it on somebody’s job.
The setup I recommend is straightforward: capped and labeled filler tubes, a clean working tray, and separate spaces for ready and contaminated tungsten. Inspect caps and labels whenever you restock, and investigate moisture instead of just adding another desiccant packet. You want the next rod and the next electrode ready to weld—not another variable to troubleshoot.