
TIG vs MIG: From 22-Gauge Sheet to 1/4-Inch Plate
TIG versus MIG isn’t really a contest over which process makes the prettiest bead. It’s a decision about puddle control, production speed, and how much equipment you need for the metal sitting on your bench. A stainless exhaust tube and a stack of 1/4-inch steel brackets don’t need the same answer.
My short recommendation: buy MIG first for general steel fabrication, and choose TIG when thin material, precise fit-up, or controlled finishing drives the job. Aluminum complicates that decision because the cheapest TIG machine usually won’t do what you need. Here’s where the choice changes.
1. Puddle Control vs Wire Speed: What You’re Actually Buying
TIG, or gas tungsten arc welding, uses a nonconsumable tungsten electrode, with filler added separately when the joint needs it. MIG, or gas metal arc welding, feeds a consumable wire electrode through the gun continuously. With TIG, you can adjust heat without simultaneously feeding more filler, so you have finer control when an edge starts melting away. With MIG, continuous wire feed lets you fill a joint quickly without coordinating a separate filler rod.
- TIG: Usually two hands, plus a foot pedal or torch-mounted current control. Torch-switch operation with preset current is also possible.
- MIG: A trigger controls the arc, and your settings establish how the wire burns off. Wire-feed speed largely governs amperage on a conventional constant-voltage machine.
- Both: Need sound joint preparation, shielding, and technique. Neither process automatically produces a strong joint.
Verdict: TIG is right when you need to manage the puddle and filler independently. MIG is right when you need to make repeatable joints quickly, especially while learning.
2. Match the Process to Mild Steel, Stainless, or Aluminum
Mild steel gives you the broadest choice: DC TIG and conventional MIG both handle it well. For TIG, use DC electrode negative, commonly called DCEN, with argon shielding and a suitable filler such as ER70S-2. For short-circuit MIG, ER70S-6 wire with 75% argon/25% CO2 is a common shop combination, normally running electrode positive. Grind coatings, rust, and mill scale from the joint rather than expecting the arc to fix your preparation.
Stainless: Finish and Root Protection Matter
For thin 304L stainless, DC TIG with ER308L filler gives you useful control over bead size and the finished surface. Stainless MIG is perfectly legitimate for fabrication, but the shielding gas must suit the wire and transfer mode; don’t assume your mild-steel 75/25 bottle is appropriate. Full-penetration stainless tubing commonly needs an argon back purge to protect the root from oxidation. TIG shielding on the outside won’t prevent sugaring inside the tube.
Aluminum: Check AC Capability Before Paying
For ordinary shop aluminum TIG, buy an AC-capable machine; a DC-only TIG label isn’t enough. AC provides an electrode-positive portion that helps break up surface oxide, while the electrode-negative portion puts more useful heat into the work. MIG aluminum normally uses DCEP, argon shielding, and an aluminum-capable feeding setup, often a spool gun or push-pull gun. Choose 4043 or 5356 filler according to the alloy, service conditions, and finishing requirements—not whichever spool is cheapest.
Verdict: Favor TIG for thin stainless and detail-oriented aluminum work. Favor MIG for mild-steel fabrication and longer aluminum joints where deposition rate matters.
3. Thickness Changes the Winner—and the Starting Settings
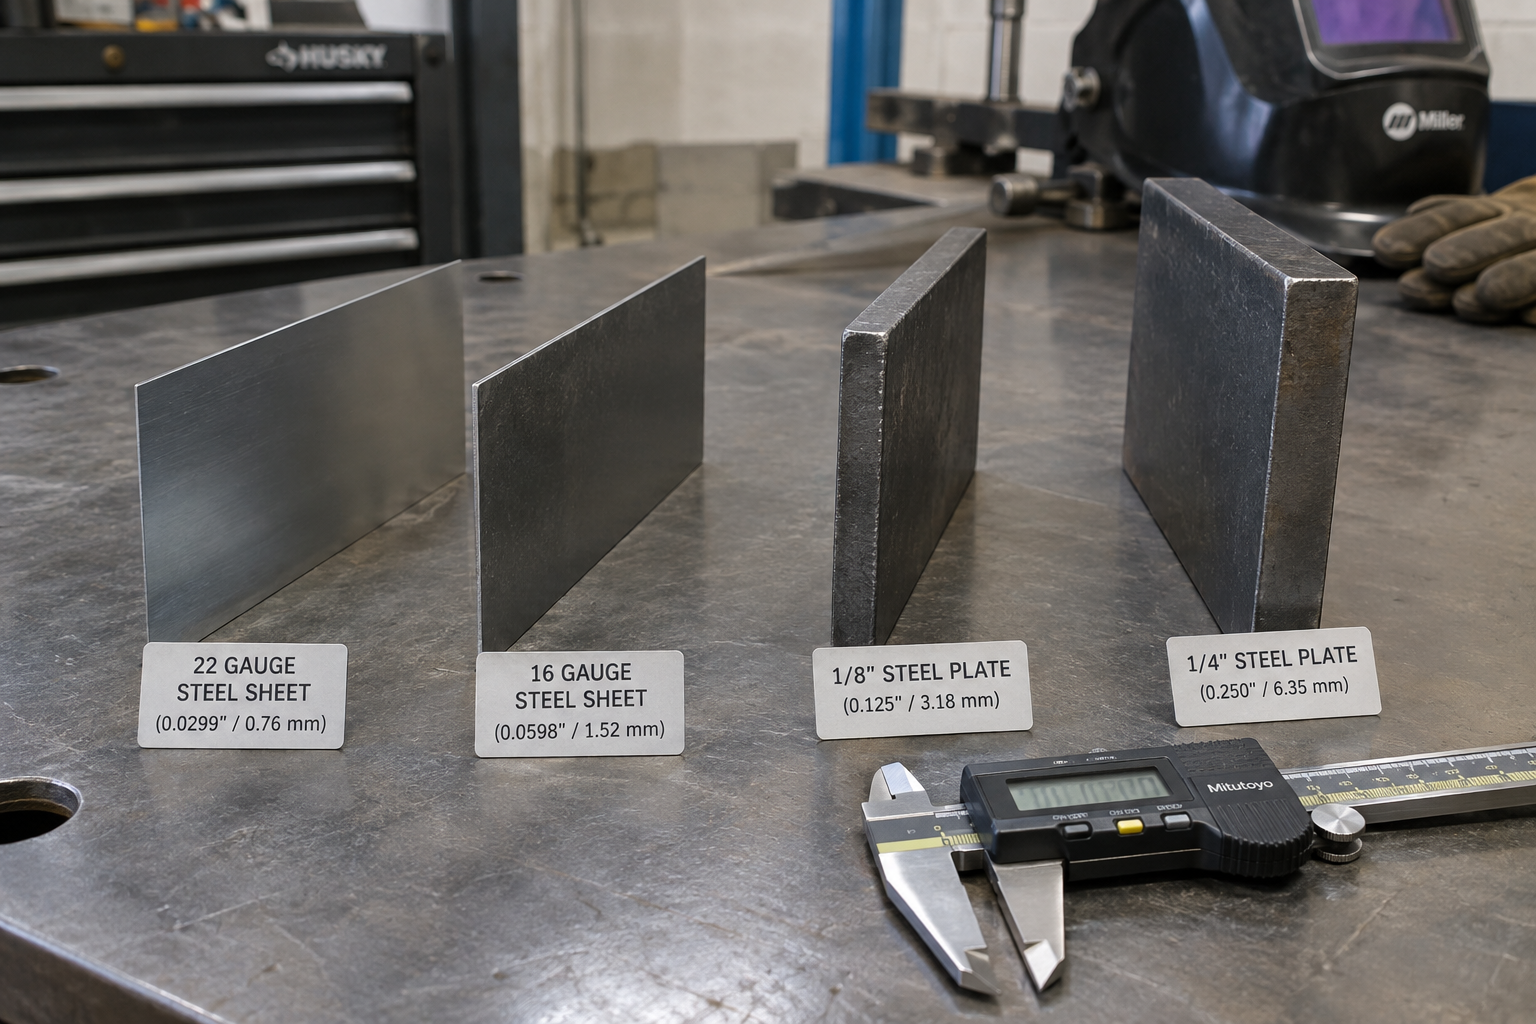
Thin edges punish slow reactions, while thick joints punish inadequate output and poor preparation. That’s why material thickness is more useful than a machine’s advertised list of weldable metals. The ranges below are practical selection guidance, not maximum capacities or a welding procedure. Joint shape, fit-up, position, alloy, and heat sinking all change what works.
| Workpiece | Practical Starting Choice | What Changes the Decision |
|---|---|---|
| 22-gauge steel, about 0.030 inch | TIG for precise, close-fitting joints; MIG for spaced body-panel tacks | Gaps and long continuous welds increase burn-through and distortion risk. |
| 16-gauge steel, about 0.060 inch | Either process | Choose TIG for controlled bead size, MIG for repeated fabrication. |
| 1/8-inch steel, about 3.2 mm | MIG for throughput; TIG for detail work | Both suit a properly equipped small shop. |
| 1/4-inch steel, about 6.4 mm | MIG for most general fabrication | Joint preparation, transfer mode, access, and multiple passes may be necessary. |
| 1/8-inch aluminum | AC TIG for short, precise joints; MIG for production | Large parts pull heat away and may demand more output. |
On clean 1/8-inch mild steel, a useful DC TIG trial setup is a 125–150 A pedal ceiling, a 3/32-inch lanthanated tungsten, and 1/16- or 3/32-inch filler. Start around 15–20 CFH of argon with a suitable cup and indoor conditions, then adjust coverage rather than blindly increasing flow. For short-circuit MIG with 0.030-inch ER70S-6 and 75/25 gas, roughly 18–20 V and 250–350 inches per minute is a reasonable test range on that thickness. Start with the machine’s chart and verify fusion on matching scrap.
For 1/8-inch aluminum TIG, a 150–180 A ceiling, roughly 100–120 Hz AC frequency, and about 70% electrode negative can be sensible trial settings. Check the balance display: some machines show cleaning percentage instead of electrode-negative percentage. Verdict: Thin precision work favors TIG; as joint volume grows, MIG becomes harder to argue against.
4. Compare Finished-Part Time, Not Just Bead Appearance
MIG usually wins arc-on productivity because it feeds filler continuously and supports higher deposition rates. TIG takes more coordination, and manually feeding rod into a long, heavy fillet eats time. But TIG can save finishing time when a small, clean bead is supposed to remain visible. The useful comparison is minutes per acceptable part, including preparation, joining, straightening, and cleanup.
A 30-by-30-inch stainless frame can pull out of square with either process. TIG isn’t automatically a low-heat process just because the bead looks tidy; moving slowly can put plenty of heat into the assembly. Tack the frame square, alternate joint locations, and use a sequence that limits accumulated shrinkage. Don’t join one whole side and then act surprised when the diagonals disagree.
- Visible stainless joints: TIG often reduces spatter removal and gives better control of the finished profile.
- Repeated steel brackets: MIG generally lowers labor per joint.
- Critical joints: Appearance doesn’t prove penetration or fusion. Use the specified procedure and required inspection.
Verdict: Pick TIG when controlled finishing offsets slower work. Pick MIG when joint length and volume dominate the job.
5. Buy Useful Amperage, Duty Cycle, and Controls
A “200 A” badge doesn’t tell you how long the machine can actually run at that output. A 20% duty cycle at 200 A typically means two minutes of arc time in a ten-minute period under the manufacturer’s stated test conditions, followed by cooling. Compare machines at the same amperage and ambient temperature, not just their largest printed number. For frequent 1/4-inch steel work, I’d prioritize a capable 230 V MIG over a small 120 V unit operating at its limit.
- TIG low-end control: Thin sheet benefits from stable output around 5–10 A, dependable high-frequency starting, and a pedal with smooth response.
- TIG aluminum controls: Look for AC balance and frequency adjustment. Pulse is useful, but it doesn’t replace either.
- MIG feeding quality: Inspect the drive assembly, tension adjustment, spool hub, liner access, and availability of contact tips.
- Torch capacity: Sustained high-current TIG can justify a water-cooled torch and cooler. Check the torch’s AC and DC ratings separately.
- Portability: Include the cylinder, leads, pedal, and cooler in your moving weight—not just the inverter.
A multiprocess machine may offer excellent MIG and only basic DC lift-start TIG. That does not make it an aluminum TIG machine, and pedal support may be absent. Verdict: Buy against the actual process features and rated working output, with serviceable consumables ahead of a fancy screen.
6. Budget for the Whole Setup, Then the Cost per Job
For a new small-shop machine in the U.S., broad planning ranges are about $450–$1,000 for gas MIG, $500–$1,200 for DC TIG, and $900–$2,500 for AC/DC TIG. These aren’t price quotes, and industrial equipment runs considerably higher. Check whether the package includes a regulator, torch or gun, pedal, and work lead. A cheap bare machine can become an expensive shopping list.
| Additional Item | Approximate Budget |
|---|---|
| Purchased shielding-gas cylinder with initial fill | $250–$500, depending on size and local terms |
| Starter filler, wire, and process consumables | $75–$200 |
| Compatible aluminum spool gun | $200–$600; verify machine support |
| TIG cooler and water-cooled torch package | $600–$1,200 or more |
Allow separately for PPE, ventilation, workholding, and any electrical installation. Running both processes on steel usually means two shielding-gas supplies: argon for TIG and a suitable argon/CO2 mix for MIG. MIG may use more gas per minute, but TIG’s slower travel and preflow/postflow mean that minutes matter too. For paid fabrication, labor often outweighs the difference in filler cost.
Verdict: MIG usually gives a steel-focused beginner the lowest cost per completed project. AC/DC TIG earns its higher setup cost when the work genuinely needs its control.
7. Choose for Your Next Ten Projects
I’d base the purchase on the next ten jobs, not the one exotic repair you might attempt someday. Mostly carts, brackets, gates, and steel frames points toward MIG. Mostly stainless tubing, small aluminum assemblies, and precision bench work points toward TIG. If you need both eventually, buy the process that handles your regular workload first.
- List the alloys and actual thicknesses. Measure tubing wall thickness, not its outside diameter.
- Estimate joint length and finish requirements. Ten feet of fillet is different from four visible tube joints.
- Check power, access, and shielding. A pedal needs workable positioning, and both gas-shielded processes need protection from drafts.
- Test representative joints. Check fusion and distortion before committing to a batch.
Neither process gets a safety exemption because it looks clean: use suitable eye and skin protection, ventilation, and securely restrained cylinders. Shielding gas can displace oxygen, particularly in confined spaces, and stainless fumes need serious control. For structural or pressure-containing work, follow the applicable procedure and qualification requirements. Choose the process that makes a sound joint efficiently—not the one that wins the bead-photo contest.